
How to Install Playwright on Your Local System: A Complete Guide
Playwright is a modern, open-source automation library developed by Microsoft that allows developers to automate and test web applications across major browser engines, including Chromium, Firefox, and WebKit (Safari). Offering a unified, fast, and feature-rich API, Playwright is a top choice for both end-to-end testing and complex web scraping tasks.
Because Playwright operates directly with browser debugging protocols, it is highly resilient, supports out-of-the-box auto-waiting, and can easily handle dynamic, modern web pages that rely heavily on JavaScript.
In this guide, you will learn how to set up and install Playwright on your local machine, configure your project, run your first automation script on a test website, and generate comprehensive test reports.
Why Choose Playwright for Automation and Web Scraping?
Before starting the installation, it is helpful to understand how Playwright compares to other popular browser automation tools like Selenium and Puppeteer.
| Feature | Playwright | Puppeteer | Selenium |
|---|---|---|---|
| Supported Browsers | Chromium, Firefox, WebKit (Safari) | Chromium, Firefox (experimental) | Chromium, Firefox, Safari, Edge, IE |
| Supported Languages | TypeScript, JavaScript, Python, Java, .NET | TypeScript, JavaScript | Java, Python, C#, Ruby, JavaScript |
| Auto-Waiting | Built-in (smart waiting for elements) | Limited (requires manual wait selectors) | No (requires manual explicit or implicit waits) |
| Execution Speed | Extremely fast (uses browser context isolation) | Fast | Moderate (higher JSON wire protocol overhead) |
| Multi-Tab / Multi-Domain | Supported natively | Supported | Limited and complex to configure |
Playwright is particularly powerful for modern front-end frameworks (React, Angular, Vue) because it automatically waits for elements to be actionable before performing interactions. This dramatically reduces the occurrence of flaky tests and fragile scrapers.
Prerequisites and System Requirements
To run Playwright locally, your system must meet the following baseline requirements:
- Operating System: Windows 10+, macOS 11 (Big Sur) or newer, or Ubuntu Linux (20.04 LTS or newer).
- Runtime Environment: Node.js (LTS version recommended).
- Editor: A code editor like Visual Studio Code (VS Code) is highly recommended, as it features an official Playwright extension for running and debugging scripts visually.
Step 1: Install Node.js and NPM on Your System
Playwright is distributed as an NPM package and requires Node.js to execute. If you do not have Node.js installed, download the recommended Long Term Support (LTS) installer from the official Node.js website.
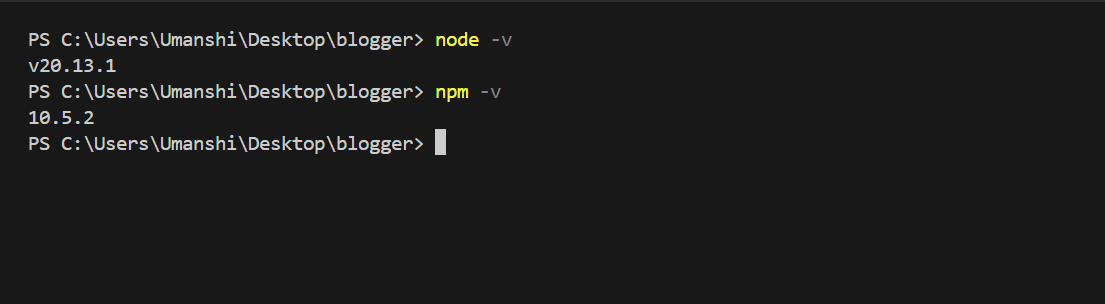
Once installed, verify that Node.js and NPM are available in your path by opening your terminal, command prompt, or PowerShell and running:
node -v
npm -v
This should return the installed versions:
# Example Output:
# v20.13.1
# 10.5.2
Step 2: Initialize Playwright in Your Project
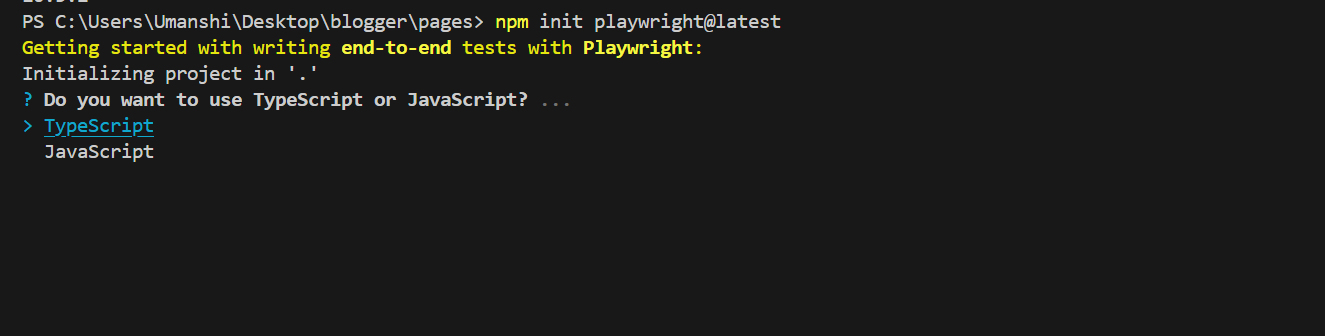
While you can install Playwright manually, the easiest and most reliable method is to use the interactive installer. This command sets up the entire boilerplate configuration, directories, and browser binaries automatically.
Create a new directory for your automation project, navigate into it, and run the initialization command:
mkdir playwright-automation
cd playwright-automation
npm init playwright@latest
Step 3: Configure Your Installation Options
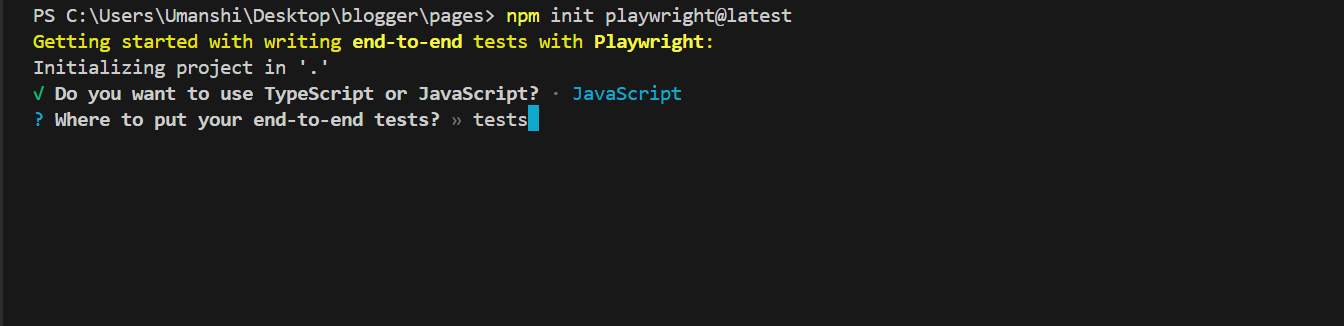
During the initialization process, the terminal will prompt you with a series of configuration choices. Select the settings that best fit your project workflow:
- Choose language: Select TypeScript or JavaScript (TypeScript is the default and is highly recommended for its autocompletion and robust type-checking features).
-
Tests folder: Name the directory where your tests will live (default is
tests). -
CI integration: Choose whether to add a GitHub Actions workflow configuration (default is
false). Selectingtruegenerates a ready-to-use configuration file for automated pipelines. -
Install Playwright browsers: Choose whether to download the custom browser binaries (default is
true/Y). Select yes so that Playwright installs the correct versions of Chromium, Firefox, and WebKit to match your Playwright library version.
Step 4: Review the Installed Project Structure
Once the installer finishes, it will create a set of configuration files and folders in your project directory:
├── playwright.config.ts    # Main configuration file (timeouts, browsers, retries)
├── package.json            # Node project metadata and dependencies
├── package-lock.json       # Locked versions of dependencies
├── tests/                  # Directory for your custom automation scripts
│   └── example.spec.ts     # A basic example test script
└── tests-examples/         # Directory containing complex, real-world examples
Key Files Explained:
-
playwright.config.ts: This file governs how your tests run. Here, you can configure settings such as headless vs. headed runs, viewport sizes, network throttling, base URLs, screenshot-on-failure capture, and parallel test execution settings. -
tests/: This is where you will write your test specs. Any file ending with.spec.tsor.spec.jsinside this folder will be picked up by the Playwright test runner automatically.
Step 5: Write and Run a Practical Screenshot Script
To verify that Playwright is working correctly, let’s create a practical automation script. In this example, we will navigate to the Scraping Sandbox website, configure a custom viewport, and save a full-page screenshot.
If you are scaling screenshot operations or need an enterprise-grade cloud service to take automated screenshots without maintaining browser servers locally, you can also use Agenty’s cloud-based screenshot tool.
Create a new file named tests/screenshot.spec.js (or .ts) and add the following code:
import { test, chromium } from '@playwright/test';

test('Capture website screenshot', async () => {
  // Launch the Chromium browser
  const browser = await chromium.launch({ headless: true });

  // Create a new browser context with a custom viewport
  const context = await browser.newContext({
    viewport: { width: 1280, height: 720 },
  });

  // Open a new page/tab in the browser context
  const page = await context.newPage();

  // Navigate to the Scraping Sandbox website
  await page.goto("https://scrapingsandbox.com/");

  // Capture a full-page screenshot and save it to the project root
  await page.screenshot({ path: "products.png", fullPage: true });

  // Close the browser session
  await browser.close();
});
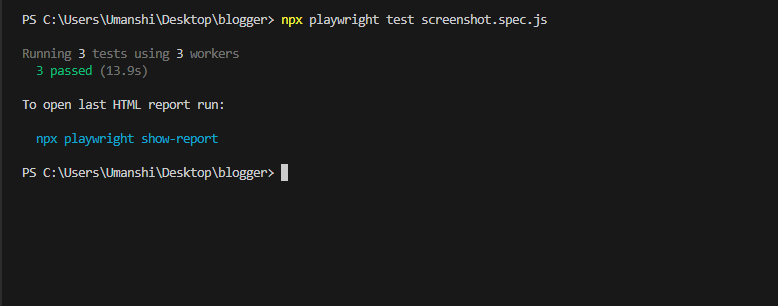
To run this specific test script, execute the following command in your terminal:
npx playwright test tests/screenshot.spec.js
Understanding How Tests Run
By default, running npx playwright test will run all tests inside your tests/ folder. Playwright executes tests in headless mode (meaning the browser runs silently in the background without opening a physical window) across all three configured browsers: Chromium, Firefox, and WebKit.
If you want to watch the browser perform the actions visually, run the test with the --headed flag:
npx playwright test tests/screenshot.spec.js --headed
Step 6: Generate and View HTML Test Reports
After executing your automation scripts, Playwright compile results into an interactive HTML dashboard. This report provides deep insights into your automation runs, detailing execution timelines, network requests, terminal logs, and screenshots or video recordings of failures.
To open the generated report, run:
npx playwright show-report
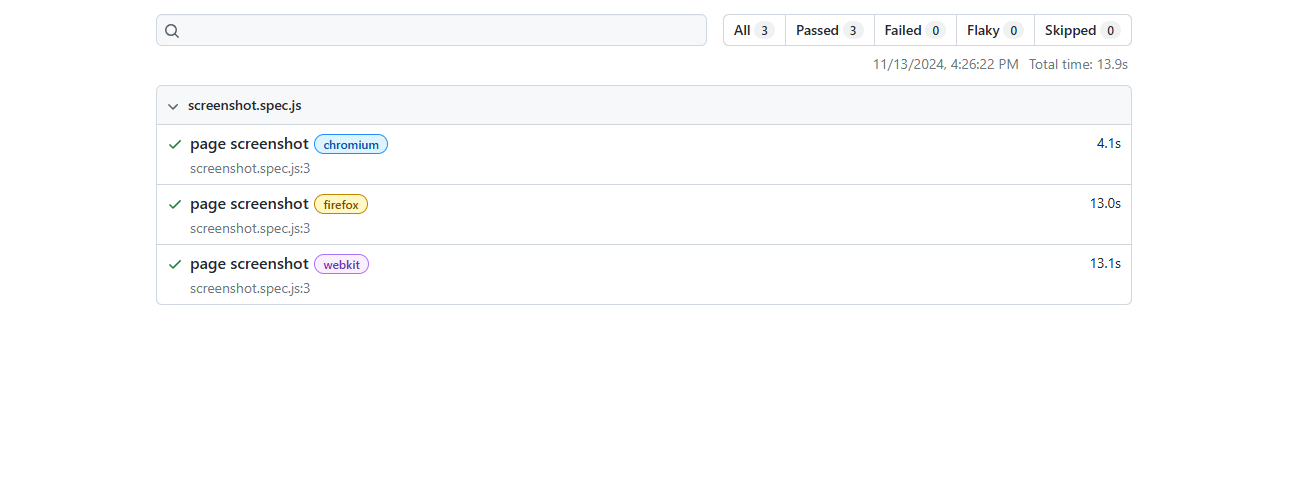
The command spins up a local web server to host the HTML report, allowing you to filter executions by status (passed, failed, skipped, flaky) and inspect exact steps that failed.
Beyond Testing: Using Playwright for Web Scraping
While Playwright is primarily designed as an end-to-end testing tool, its ability to execute JavaScript, bypass common anti-bot techniques, handle single-page applications (SPAs), and manage user interactions makes it an exceptional framework for web scraping.
For example, when scraping e-commerce websites or listings, Playwright handles challenges like infinite scrolling, lazy loading, and next-click pagination seamlessly using custom scripts.
However, running headless browsers locally at scale presents infrastructure hurdles, such as high CPU usage, IP bans, and CAPTCHA bottlenecks. For massive data extraction tasks without infrastructure overhead, Agenty’s managed scraping agent provides a robust, cloud-based alternative that handles proxy rotation, dynamic pages, and automated parsing automatically.
Troubleshooting Common Playwright Installation Issues
1. Error: “Executable doesn’t exist” or Missing Browser Binaries
If you run a script and receive an error indicating that browser executables are missing, your system did not download the browser binaries during initialization. Fix this by running:
npx playwright install
2. Linux Dependencies Missing
If you are running Playwright inside a Linux environment (such as Ubuntu or a Docker container), you may encounter errors regarding missing system libraries for Chromium or WebKit. Install the required system dependencies using:
npx playwright install-deps
3. Execution Timeout Errors
By default, Playwright has a default timeout of 30 seconds for test runs. If your network is slow or a page loads a high volume of assets, you can increase the timeout directly inside your playwright.config.ts file:
// playwright.config.ts
import { defineConfig } from '@playwright/test';

export default defineConfig({
  timeout: 60000, // Set global timeout to 60 seconds
  use: {
    navigationTimeout: 15000, // 15 seconds page navigation timeout
  },
});
Frequently Asked Questions
Can I run Playwright scripts in languages other than JavaScript or TypeScript?
Yes. Although Node.js is the native platform, Playwright offers official first-party bindings for Python, Java, and .NET (C#). The browser orchestration architecture remains identical across all language versions.
How do I update Playwright to the latest version?
To keep your browser binaries and Playwright library up-to-date with the latest web standards, run the package update command:
npm install @playwright/test@latest
npx playwright install
Does Playwright support proxy servers for anonymous scraping?
Yes. You can route your browser context requests through rotating proxy servers by specifying the proxy configuration inside the launch settings:
const browser = await chromium.launch({
  proxy: {
    server: 'http://my-proxy-server.com:8080',
    username: 'user',
    password: 'password'
  }
});
Conclusion and Next Steps
You now have a fully functional Playwright environment running locally on your machine. You can create robust automation workflows, run automated cross-browser tests, and capture high-resolution screenshots of dynamic websites.
To build on your setup:
- Explore advanced locator mechanisms to click elements and fill out forms.
- Integrate Playwright with CI/CD platforms like GitHub Actions or GitLab CI to automate testing on push.
- Learn about browser contexts to isolate cookies and sessions for multi-user test flows.